Exchange Room Sync Configuration and Integration with Korbyt Booking
This article outlines the steps to configure Exchange room sync in Korbyt Booking, Bookit, and Bookit Plugin.
Written By Ed Kinne
Introduction
This article covers the Exchange Room Sync API and the Exchange Room Sync service. Included are instructions on configuring Exchange Room Sync-related settings in Korbyt Booking, a matrix for application support, and the complete deployment process. Using this Exchange room sync service, bookings created from any interface can be automatically synchronized into any other connected system. The integration will also support bulk importing of existing appointments from Exchange to Korbyt Booking.
This article is also available as the attached PDF document
Exchagne Room Sync Configuration - Oct 2025.pdf
1021.2 KB• Document
Application configuration with Users and Resources
Points to remember:
If you have On-Premise Exchange, you can only use EWS (Basic authentication), and the Exchange version must be 2012+
If you are using Exchange Online, you must use Graph.
If you are between On Premise and Online, using both, then it is recommended that EWS is used
If using a hybrid system, then you will need to configure each of the Exchange connections. Rooms and users in each Exchange will need to be assigned to their correct Exchange individually. Note the following permutations. The first three are supported, but the last one is not.
Supported - User On-Prem (EWS) and Resource Mailbox On-Prem (EWS)
Supported - User On-Prem (EWS) and Resource Mailbox Online (Graph)
Supported - User Mailbox Online (Graph) and Resource Mailbox Online (Graph)
Not Supported - User Mailbox Online (Graph) and Resource Mailbox On-Premises (EWS)
Types of Exchange configuration/authentication options supported
EWS on-premises (basic authentication only)
Graph API (online only)
Note: EWS OAuth is NOT supported when using Exchange Rooms Sync
Deployment Process
This section describes all the configurations required from the Korbyt Booking interfaces to enable the Exchange Sync integration.
All information below assumes that a Korbyt Booking system already exists. There is a separate checklist on what is also required that is not unique to Exchange Room Sync.
Please refer to the Exchange Settings Checklist if you are unsure what is assumed to be a ‘working Korbyt Booking system’.
Prerequisites
Exchange EWS URL and service account (when using basic authentication)
App Registration in Azure for Graph API
The user creating the app registration needs Global Admin rights in Azure.
HTTPS must be enabled.
Inbound and outbound internet traffic must be allowed. On-prem clients should refer to the following URLs for details on IP addresses that need to be whitelisted when accessing Exchange Online (Graph).
This Microsoft support article lists all the Microsoft Endpoints in a JSON format file:
An additional list of IPs needed can be found on this Microsoft support article:
Other endpoints not included in the Microsoft 365 IP Address and URL Web service
Minimum version: Korbyt Booking V8.4.2.1
Other interfaces such as Bookit, Outlook, and Mobile as required
Employee Sync is done to import all users
Resource Sync to import all resource mailbox aliases
Korbyt Booking Webservice API
Korbyt Booking EWS Connector
Korbyt Booking ExchCal Service (Setup described below)
Korbyt Booking ExchCal Sync API (Setup described below)
Exchange resource mailboxes are configured correctly (see below)
If applicable, import existing resource appointments into the Korbyt Booking Workspace
Exchange Room Mailbox Information
The resource settings will vary depending on how the resources were created, i.e., using PowerShell or browser UAC (User Account Control).
The PowerShell command used to get calendar processing details:
Get-CalendarProcessing " Room Name " |fl
Using Exchange Server PowerShell (Exchange Management Shell), use the Set-CalendarProcessing cmdlet to modify calendar processing options for individual resource mailboxes as shown below:
Set-CalendarProcessing -Identity "Room Name” -AutomateProcessing AutoAccept -DeleteComments $false -DeleteSubject $false
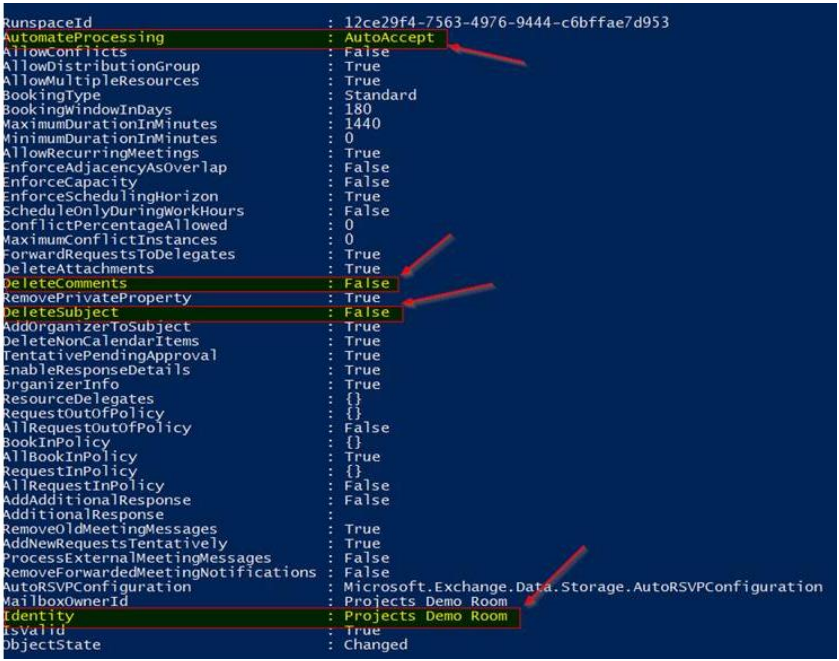
The rules and restrictions set within Korbyt Booking should, where possible, be reflected in Exchange. Consider discussing these to avoid out-of-sync situations. For example, Korbyt Booking does not support recurring bookings with no end date. There will be a limit imposed in Korbyt Booking for the maximum number of occurrences allowed. If this is not observed in Exchange for future bookings, the systems may be out of sync.
Documentation from Microsoft explaining Room Resource Calendar Processing:
Microsoft Support Article - Set-CalendarProcessing
Exchange Room Sync Config File Setup
Regardless of how the connection with Exchange is being established, this section must be completed.
This will be done by a Korbyt technician.
Korbyt Booking ExchCal Sync API
Expand to See Details for Setting Korbyt Booking ExchCal Sync API:
Expand to See Details for Setting Korbyt Booking ExchCal Sync API:
Create a virtual directory for this folder – ensure the authentication is set to “Anonymous”.
Configure the log file path within the web.config file. Relative file paths work so an explicit path is no longer required.
Configure the Database connection string – Can use fixed account or integrated security. SQL Authentication Windows Authentication
SQL Authentication
<add name="RendezvousConnectionString" connectionString="Server=(ServerName);Database=(DatabaseName);User=(Username);Pwd=(Encrypted Password)=" providerName="System.Data.SqlClient" />
Windows Authentication
<add name="RendezvousConnectionString" connectionString="(ServerName);Database=(DatabaseName);Persist Security Info=False;integrated security=SSPI;Trusted_Connection=Yes" />
Expand to See Details for Setting the Korbyt Booking Exch Service
Expand to See Details for Setting the Korbyt Booking Exch Service
Edit the ExchangeEventSync Service Nfs.ExchangeEvent.Service.exe.config file and configure the following settings:
Log file path
<file value="..\Log Folder\ExchCal Service\NFSExchCalSyncService.log" />
Exchange Event Sync API URL
<add key="ExchangeEventSyc:WebApiUrl" value="https://servername/WorkspaceExchSyncAPI/" />
Webservice API URL
<add key="QuickBook:WebApiUrl" value="https://servername/WorkspaceWebserviceAPI/"/>
Windows Service Name
<add key="ServiceName" value="Korbyt Exchange Calendar Service - Workspace" />
Other App Settings to consider are listed below, mainly in the order that they were
introduced in the application.
<add key="IsPastBookingAllowed" value="true" />
(Consider importing or syncing past bookings created in Exchange. This key is now superseded by a newer key mentioned below called “AllowPastBookingForNoOfDays”.
Note that if you create a past booking in Korbyt Booking, it will NOT sync to Exchange; therefore, it is recommended that BRE is set to not allow past bookings.)
<add key="MaxRecurrenceAllowed" value="99" />
(The value for the above key should match the global setting value in the application. This is the maximum number of occurrences from Exchange that will get synced. Be aware and inform the client that if there are more than this number of occurrences in the series, they will not get synced to Korbyt
Booking).
<add key="FromMail" value="DoNotReply@nfs.com" />
<add key="AlertMailTo" value="abc@test.com;xyz@test.com” />
(The above two keys are used to configure the email addresses for the sender and recipient(s) for email alerts triggered by specific Exchange-related issues.
<add key=”WaitTimeForSubscriptionAlert” value=”30” />
(When a room subscription expires, the system would generate an alert email if the expiration occurred, or the subscription was not done within the last 30 minutes. This setting allows administrators or users to receive timely notifications about expiring subscriptions and take appropriate actions)
<add key=”WaitTimeForTimerNotificationAlert” value=”60” />
(If the "Active Exchange Timers" are not functioning correctly within the last configured minutes (ex. 60), the system will generate an alert email. This setting aims to provide timely notifications to administrators or users about a possible malfunction or specific timers not working as expected in the
Exchange Service)
<add key=”EnableTimerNotificationAlert” value=”false” />
(Set to true to receive alert emails about Active Exchange Timer not running. This configuration setting controls whether or not alert emails will be sent for the scenario when an Active Exchange Timer is not running)
<add key=”EnableSubscriptionAlert” value=”false” />
(Set to true to receive alert emails about expired room subscriptions. The sender/recipient will be the
addresses configured in the “FromMail” and AlertMailTo” addresses)
<add key=”SubscriptionEmailSendAfterEveryMin” value=”480” />
(When an alert email is initially sent for an expired room subscription related to a particular resource, the system will wait for 480 minutes (or 8 hours) before sending the next alert email for that same resource
if the subscription remains expired. This setting helps to control the frequency of alert notifications and prevents excessive or unnecessary emails from being sent within a short period)
<add key=”TimerEmailSendAfterEveryMin” value=”480” />
(By setting this timer to 480, it suggests that the system will wait for 480 minutes (or 8 hours) before
triggering another alert email if the "Active Exchange Timers" continue to be non-functional. This interval allows for a grace period before sending subsequent notifications to avoid overwhelming administrators or users with frequent alerts)
<add key=”TimeIntervalCheckResourceStatusInExchange” value=”15” />
(Whenever a booking is created, modified, or canceled from Webapp/Bookit with an Exchange resource, a timer within the system will trigger after the specified number of minutes configured in this setting.
This timer initiates a process to fetch the updated ExchangeStatus of the bookingItem associated with the Exchange resource)
<add key=”SendDeclinedMail” value=”false” />
(This setting controls whether or not declined emails will be sent for bookings that are created, modified, or cancelled from the Webapp or Bookit)
<add key=”StopExchangeService” value=”false” />
(This configuration setting controls whether the Exchange Service should be stopped when incorrect Graph API credentials are detected)
<add key=”SendNetworkIssueAlertAfterMin” value=”720” />
(The system will send a network issue alert based on the interval configured).
<add key=”OnDeclinedAllowBookingCancel” value=”true” />
(This configuration setting determines whether declined bookings made through the Webapp or Bookit will be automatically cancelled).
<addKey=”ActiveExchangeTimerNames”value=”EWSRoomSubscriptions;GraphRoomSubscriptions;MastersTableProcessing;NonRecExchNotificationAppointmentSync;RecExchNotificationAppointmentSync;WorkspaceActionTBLBookingToExchange;ImportExchangeToWorkspaceUsingEWS;UpdateBookingExchangeReferenceNumber;Impor
tExchangeToWorkspaceUsingGraph;CheckRoomSubscriptionsAlert;CheckWorkspaceResourceStatusInExchange;Office365AppointmentSync” />
(This configuration setting specifies the names of the active Exchange timers that will run for the
specified service. If there are multiple Exchange services configured across various servers, then it is
possible to have various active timers managed across these distributed services. For example, the
action table Exchange alerts gets processed by a different service to room subscriptions).
<add key=”ParallelThreadExchNotificationCount” value=”7” />
(The default value for this setting is 7 and can be increased up to 14 if there are performance issues. It relates directly to one of the active timers [NonRecExchNotificationAppointmentSync] and enables
faster concurrent processing of non-recurring notifications from Exchange)
<add key=”CancellationWaitTime” value=”0” /> <!—0 is default value→
(This setting specifies the amount of time the service will wait before retrying the cancellation process for an appointment that was not found in Exchange. If this setting is not defined, its default value is 0,
which means the booking will be cancelled immediately.
If the “CancellationWaitTime” value is set to 1, the service will change the booking’s status from 0 to 14 and after the configured number of minutes (1 in this case), the status will change from 14 to 15. Then,
after another configured time interval of minutes, the status will change from 15 to 2, indicating that the booking has been processed i.e.cancelled).
<add key=”AllowPastBookingForNoOfDays” value=”1” />
(It will allow past bookings based on the value configured e.g. if it is set 2 then it will allow current date minus 2 bookings.This is independent of the ” IsPastBookingAllowed” key, which is now redundant)
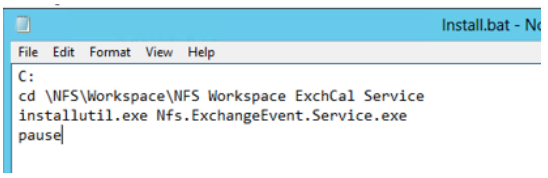
Install the Window service using command prompt or the provided batch file – If using the batch file (Install.bat) please edit this first and provide the correct physical location path and “Run as Administrator”. Remember to start the service and set to automatically start with an account having local admin privileges.
Exchange Room Sync Configuration in Azure
This section outlines all the configurations required in the Azure Portal.
Register the Application Within Azure
The following steps outline how to set up the Azure App Registration that is required when using Graph API (section below), or when using EWS OAuth (detailed in the section after Graph Api).
Graph API Configuration
Sign in to the Azure portal using an admin account.
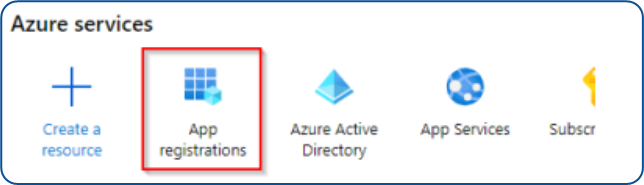
On the home screen, select the App registrations option.
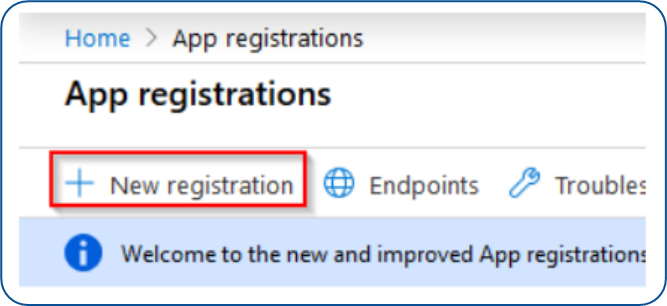
On the App registrations page, select New registration
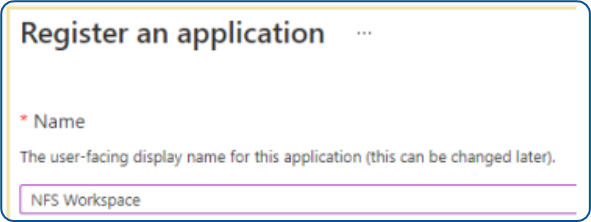
When the Register an application page appears, enter your application’s registration information:
In the Name section, enter an application name as shown below.
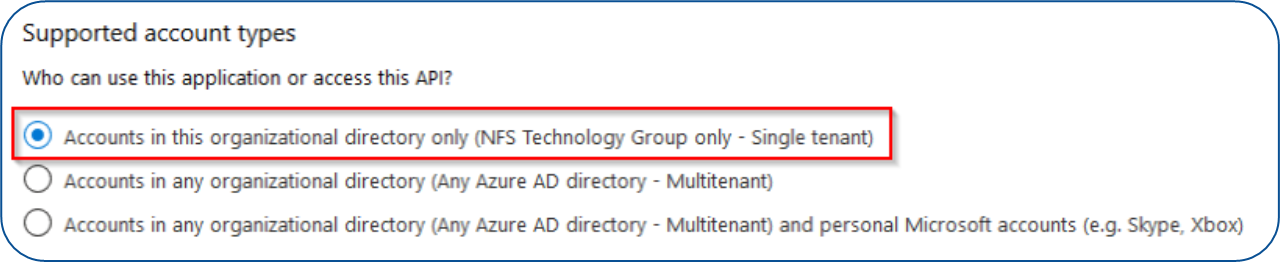
In the Supported account types section, select Accounts in the organizational directory only (Client Domain only – Single tenant)
Select Register to create the application
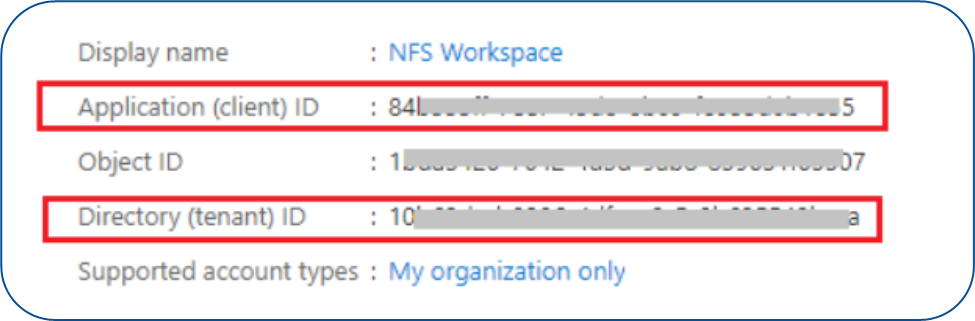
On the app Overview page, find the Application (client) ID value and the Directory (tenant) ID value and record these for later. This will be needed to configure the corresponding fields during the Korbyt Booking configuration – please supply to the Korbyt IT Team
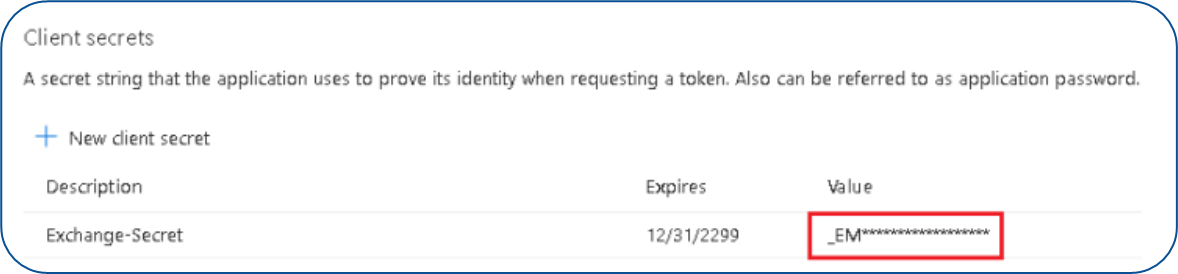
Click on the ‘Certificates & secrets’ option on the left. Create a new client secret to the desired specifications and store the key value – This is required to be entered into the Korbyt Booking system, so it will also need to be supplied to Korbyt along with the Client ID and Tenant ID.
Note: For certificate-based authentication instead of using a client secret, please refer to the document "Certificate-Based Authentication for Accessing MS Graph API" provided separately.
Be aware that if you set the secret to expire within a short time and you do not remember to set the new secret in time, your bookings will not synchronize as expected.Click on the ‘API permissions’ option on the left. Click on Add a permission => ‘Graph API’ and assign the permission set below. Set the six ‘Delegated’ type permissions as per the list below and the one ‘Application’ type permission.
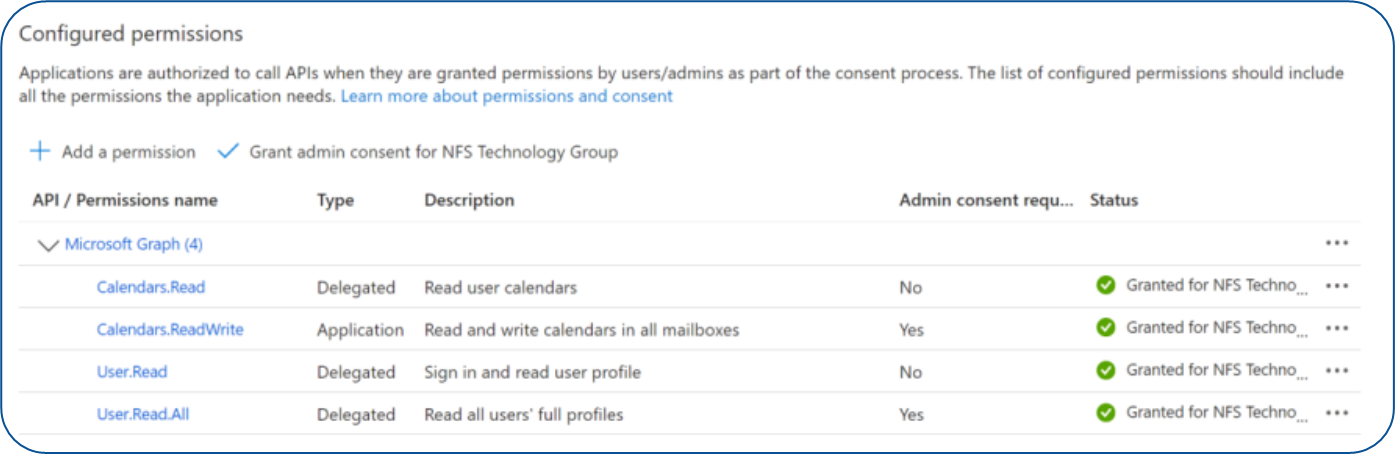
Click on the option to Grant Admin consent – this will only work if you have global admin rights.
The Azure App registration is now complete. Go to the section below, which is entitled “Exchange Room Sync Configuration - Administration”
EWS OAuth
Not supported for Exchange Rooms Sync.
Exchange Room Sync Configuration - Administration
This section describes all settings required in the front-end Korbyt Booking Web interface. There are many different options depending on what Exchange is being used and how the connection to Exchange is being established. Please ensure you are using the correct configuration set based on the environment being used.
Navigate to Administration => Settings => Global Settings. If the system was set up with Exchange settings on the main global settings page, then this option should now be disabled if you plan to use the Exchange Rooms Sync option.
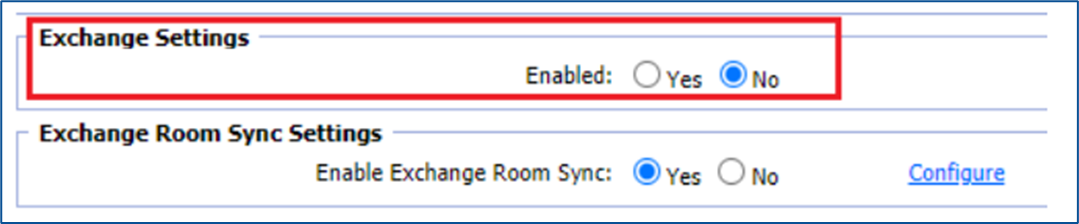
Select “Yes” for the radio button against the “Enable Exchange Room Sync”
Click on the Configure link, which will display the configuration window
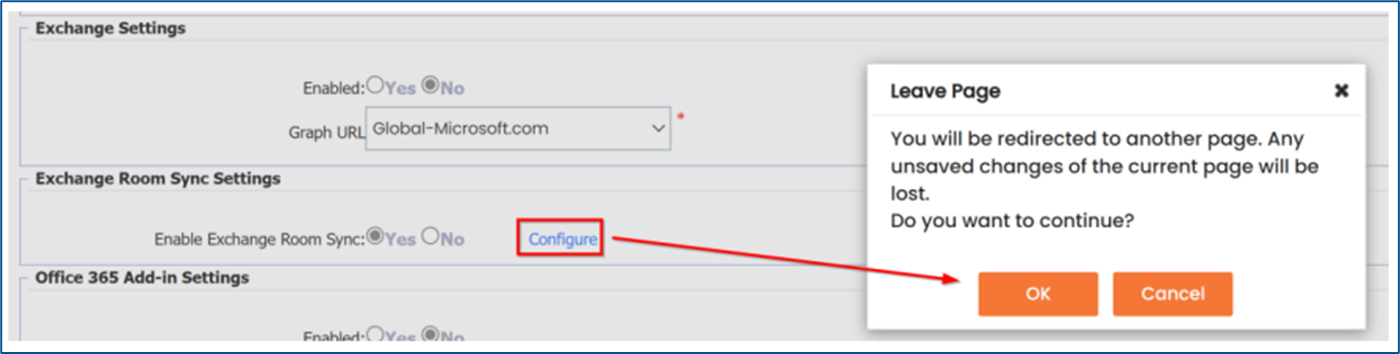
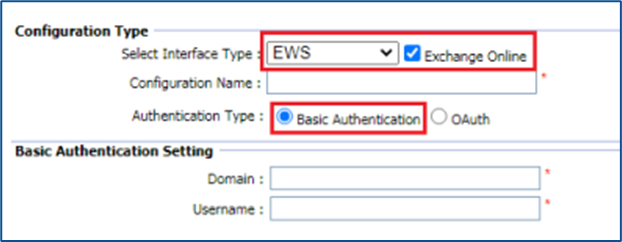
In the Configuration Type section, there is a “Select Interface Type” option.
There are two options:
EWS
Graph
See the expandable sections below for detailed instructions for both options.
Configuration Settings for EWS
Expand for EWS Configuration Details
Expand for EWS Configuration Details
Configuration Name - Must be a unique name to define the configuration settings.
Exchange Online – This is used to denote which type of Exchange is being used (On-premises or Online). It will also control the options available in the Authentication Type setting.
Authentication Type - There are two options available: Basic Authentication and OAuth. For on-premises Exchange, only basic authentication is available. For Online Exchange, only Graph is supported when using Exchange Rooms Sync. If not using Exchange rooms, but purely for calendar appointments, then OAuth may be used.
EWS Basic Authentication
When Basic Authentication is selected, the following fields will need to be completed:
Domain – The Exchange Domain being used e.g. Dev.korbyt.com
Username – The Username of an Exchange user – a service account with adequate permissions to write to all mailboxes.
Password – The Password of the same Exchange service account user
Version – The version of the Exchange server being used
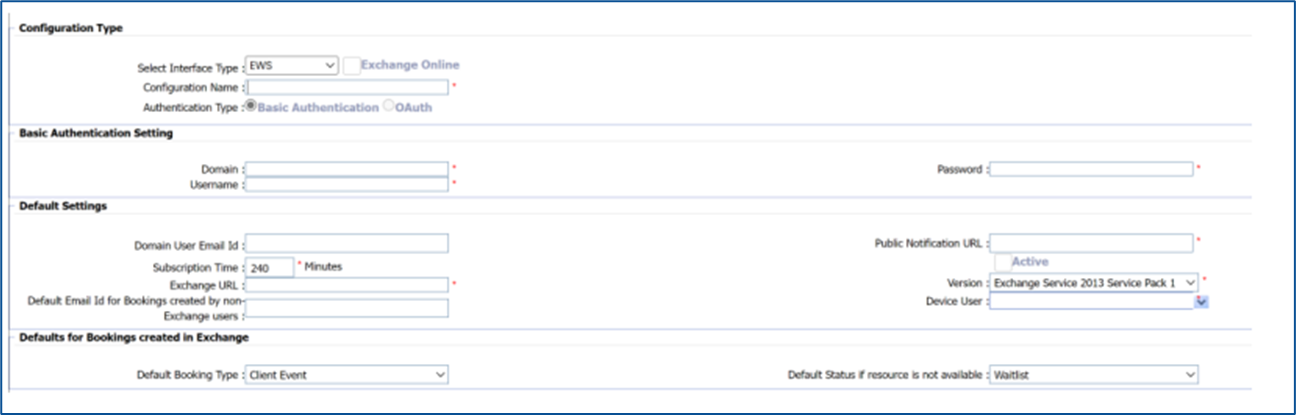
The above screenshot was replaced on April 5th 2022, to include two new settings:
Default Email Id for Bookings created by non-Exchange users and Device User, which are explained in the General Settings section below.
Note: EWS Basic Authentication is not supported when using Exchange Online. This type of configuration is not recommended as Microsoft is no longer supporting it. In V8.x it has been disabled when Exchange Online is checked.
EWS OAuth
Only select this option when using Exchange for standard calendar appointments that are not linked to Exchange Resources.
General Settings for both Basic Authentication and OAuth
The settings below must be completed when using either Basic Authentication or OAuth:
Exchange URL: The online or on-premises URL for the Exchange server.
Subscription Time: A value is required. 240 minutes is recommended, but should not be less than 120 mins. Ensures that room subscriptions do not expire.
Domain User Email Id: This can be left blank. It was previously required and needed to be an email address of an Exchange server account (could be a dummy user mailbox account that must exist in Exchange).
Public Notification URL: The URL of the Exchange Sync API Service.
Active: This checkbox is used to enable or disable the configuration settings.
Default Email Id for Bookings created by non-Exchange users: An Exchange user mailbox Id is required, to be used as the organizer for bookings made using Exchange resources by a non-Exchange user. Non-Exchange users can be flagged as such in the user configuration.
Version: Select « Exchange Service 2013 Service Pack 1 » as this is the minimum version.
Device User: This can be any dummy user created in the system and is used as the host in book is created by a device or directly from the resource calendar. Create a user called « Device User » for this purpose and assign it here.
Default Booking Type: The Korbyt Booking, Booking Type. Sets a type that all bookings created via Exchange will be given
Default status if Resource is not available: The status that will be given to bookings in Korbyt Booking if they are not available in Korbyt Booking but are still created via Exchange, e.g. Waitlist.

Configuration Settings for Graph
Expand for Graph Configuration Details
Expand for Graph Configuration Details
Two authentication types are supported for graph
The settings below must be completed:
Client Id : Taken from the Azure App Registration of the same name.
Tenant Id : Taken from the Azure App Registration of the same name.
Client Secret : Taken from the Azure App Registration of the same name.
Client Secret Expiry Date:
Log a date that can be used to give enough notice for when the secret is due to expire. This is for information and for an alert to be generated to warn administrators of the imminent expiry. An email will be sent, first seven days before, then again two days before and finally on the day before the expiry date, to the email address configured in the Exchange Cal service config file:
<add key="AlertMailTo" value="ExchUser@nfstechgroup.com" /> The email sender will be based on <add key="FromMail" value="DoNotReply@nfs.com" />
Note: The expiry date must be at least one week from the current date.

Note: For certificate-based authentication instead of using a client secret, please refer to the document "Certificate-Based Authentication for Accessing MS Graph API" provided separately.
General Settings
The settings below must be completed:
Domain User Email Id: This can be left blank. It was previously required and needed to be an email address of an Exchange server account (could be a dummy user mailbox account
that must exist in Exchange).
Subscription Time: A value is required and the recommended value is 240 mins. Ensures
that room subscriptions do not expire, i.e. should auto renew within this set time.
Default Email Id for Bookings created by non-Exchange users: An Exchange user mailbox Id is required, to be used as the organizer for bookings made using Exchange resources by a non-Exchange user. Non Exchange users can be flagged as such within the user
configuration.
Graph URL: By default this should be set to Global-Microsoft.com unless the client is using a different Microsoft cloud such as US Government.
Public Notification URL: The URL of the Exchange Cal Sync API.
Active: This checkbox is used to enable or disable the configuration settings.
Device User: This can be any dummy user created in the system and is used as the host in
bookings created by a device or directly from the resource calendar. Create a user called
« Device User » for this purpose and assign here.
Default Booking Type: The Korbyt Booking, Booking Type. Sets a type that all bookings created via Exchange will be given
Default Status if resource is not available: The status that will be given to bookings in
Korbyt Booking if they are not available in Korbyt Booking but are still created via Exchange.

Related Korbyt Booking Settings
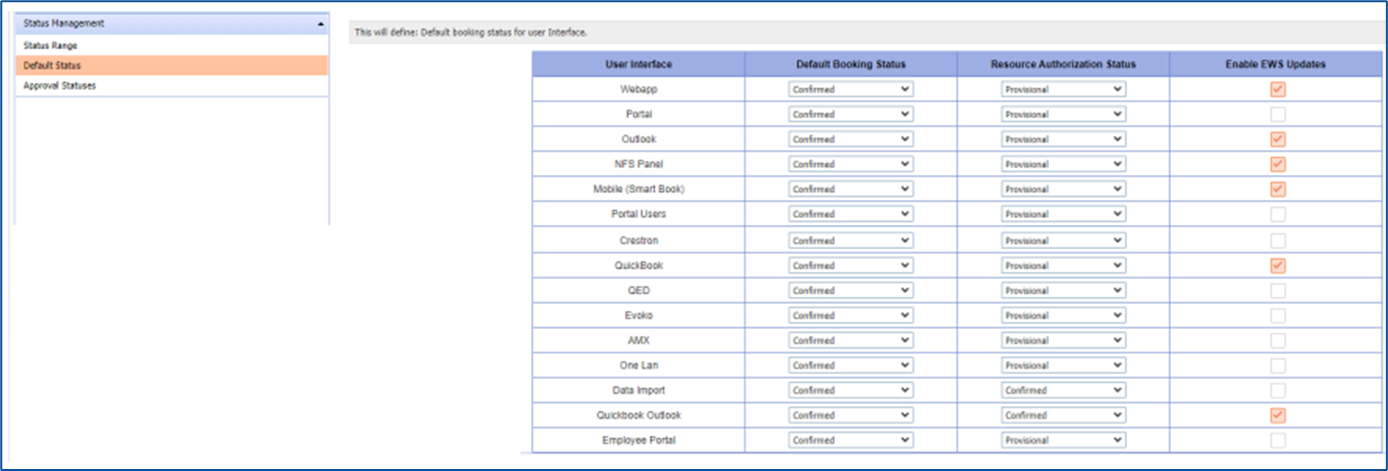
Enable EWS integration for all UI Types that will be involved in the environment.
Navigate to Administration => Settings => Global Business Rule Settings
Select the ‘Status Management’ category and then select ‘Default Status’
Under the setting row for ‘Webapp’ check the checkbox in the ‘Enable EWS Updates’ column
Check other UI types, which are usually already set.
Set the system users to use a specific Exchange connection. The Exchange connection must be set up before this step.
Navigate to Administration => User Security => User
Create a new user or open an existing user
Under the settings ‘Exchange Configuration Setting ’, select the desired Exchange Configuration setting name.

OR
Navigate to Administration => Settings => Global Settings
Under Exchange Settings, access the Exchange Room Sync settings by clicking the Configure link.
Against the Exchange Configuration, click on Apply under the All Users heading
Note – This will apply the configuration type to ALL users. If using multiple Exchange connections, do not use this option, as it will overwrite any other user’s config

Set the system resources to use a specific Exchange connection. The Exchange connection must be set up before this step.
1. Navigate to Administration => Resource Management => Resource and open a new or existing resource
Set the Exchange Configuration name within the resource configuration
Set the corresponding email address of the Exchange Resource

OR
Navigate to Administration => Settings => Global Settings
Under Exchange Settings, access the Exchange Room Sync settings by clicking the Configure link
Against the Exchange Configuration, click on Apply under the All Resources heading
Note – This will apply the configuration type to ALL resources. If using multiple Exchange connections, do not use this option, as it will overwrite any other resource’s config.
Note 2 – If using this option, it is still required to set the corresponding email address of the Exchange Resource. This will need to be done manually.
Email Aliases
Should the environment have multiple aliases per user or resource, these can be added on the user or resource configuration page under administration. Use the Employee Sync for users and the Resource Sync Utility for Resource aliases. The primary email addresses for resource mailboxes must be done manually.
Having these email aliases will streamline the Exchange room sync and avoid some issues where a migration has taken place and old email addresses are still in use.
Exchange Sync Booking Import Configuration
This section outlines how to enable and run the Exchange booking import to add existing Exchange bookings to the Korbyt Booking system. If existing bookings are not being synced, then this section is not required.
Note
This is only available for EWS
Graph API does not support this feature.
Navigate to Administration => Global Settings => Click Configure against Exchange Settings
In the Import column of the correct Exchange configuration, click the Import button
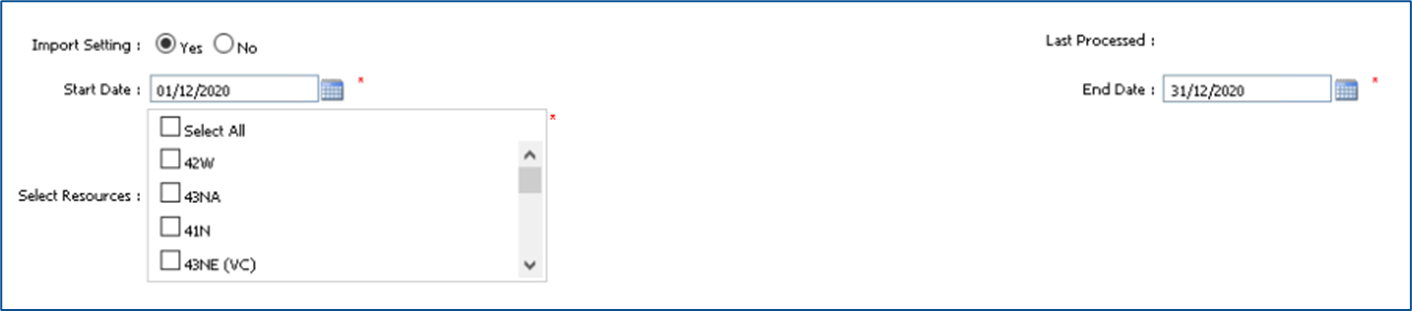
Please provide the details below:
Start Date – The start date range to import bookings
End Date – The end date range to import bookings
Select Resources – All resources that will be included in the import
Save these settings.
After saving, a message will display stating that the import has started

Once completed, a message will display stating that the import has finished

Still need help? Share an idea